
Many organizations have migrated their environments from on-premises to the cloud, and one of the clouds of choice is Microsoft Azure. For SQL Server workloads, organizations can use platform as a service solutions with features like Azure SQL Database and Managed Instance or infrastructure as a service solutions with Azure SQL virtual machines.
Azure SQL virtual machines are an easy target for organizations migrating to Azure due to the simplicity of the migration. Additionally, most organizations are already using virtual machines in some way. Azure SQL VMs offer a familiar look and feel, with the customer still responsible for the operating system and SQL Server configuration.
When it comes to getting the most out of your Azure SQL VM and making the SQL Server workload run faster, you need to make sure you have the SQL Server instance configured properly. In addition, you need to make sure you have the Azure VM sized and configured correctly for your workload.
SQL Server Configuration
Whether you deploy a VM and install SQL Server yourself or select a gallery image with SQL Server already installed, you’ll want to make sure certain settings are configured properly on your instance for your workload. Some of the key performance-related settings include the following:
Max Degree of Parallelism
By default, this setting is zero, which means SQL Server attempts to use up to 64 of the available processors during query execution. This value should initially be set based upon the number of logical cores on the system. Then, you can run tests to see whether a higher or lower setting is better for the workload. You can read the most recent Microsoft guidance here.
Cost Threshold for Parallelism
By default, this value is set to five. There’s history behind this number, but what’s important is the default is low and should almost always be adjusted higher. The number best suited to your environment will ultimately depend on your workload. I typically tell clients a value of 25 – 50 is a great starting point, and then you can fine-tune from there by analyzing the plan cache to make sure large, expensive queries take advantage of parallelism while smaller, trivial queries don’t incur the overhead of running in parallel. Don’t make the mistake of following the online advice saying to set the value to X and then just walk away—there’s no “one-size-fits-all” number for this setting. My colleague Jonathan Kehayias has a blog post showing how to examine the plan cache and tune this setting.
Instant File Initialization
This option is controlled by the Windows local security policy “perform volume maintenance tasks” and can be enabled during a SQL Server 2016+ installation. If this permission is granted to the SQL Server process, when database files are created or grow, those data files don’t have to be zero initialized. This means if a database is set to auto-grow by 10GB, SQL Server won’t have to write the 10GB to initialize the extra space in the file. This is especially important during disaster recovery of large databases, as the newly created database files where things will be restored don’t have to be initialized, saving a lot of downtime. This option should rarely not be enabled, and you can read more about it here.
Max Server Memory should be configured to make sure SQL Server has as much memory as possible without starving the operating system and other applications on the server. SQL Server 2019 offers a recommendation during installation for a Max Server Memory value based on the available memory on the machine, and Microsoft has more guidance here.
Virtual Machine Configuration
The Azure SQL VM configuration is most often what causes performance issues for customers when they reach out for help. This is true for both customers who pick a VM size and install SQL Server themselves or those who select a gallery image with SQL Server already configured.
Azure offers several VM types, such as general-purpose VMs, compute-optimized VMs, memory-optimized VMs, storage-optimized VMs, and more. Each of these has a target workload audience, and SQL Server workloads can fit into each of these specific VM types. Your current SQL Server workload should determine the VM type and size for your Azure SQL VM. Selecting the size based on CPU, memory, and storage capacity is an easy answer. How much are you consuming today?
Many existing SQL Server instances have a high memory to vCPU/CPU ratio, and Microsoft helps us out in this scenario with the M-series virtual machines (the memory-optimized series). For example, the regular DSv2 series has a core to memory ratio of 1:7 and the Edsv4 series has a core to memory ratio of 1:8, but the M-series has a core to memory ratio of 1:30 and the constrained-core VMs support up to 1:121. Constrained-core VMs are larger VMs where sockets are turned off, and they’re a great option for SQL Server VMs where you need the benefits of a larger VM, such as more memory, higher number of disks, or more I/O throughput without the core count. Constrained-core VMs allow you to take advantage of the larger VM size benefits without the cost of having to license those unneeded vCores for SQL Server.
Selecting your VM size based on vCPUs, memory, and storage capacity is simple—you just have to click through the Azure portal and make your selections. But just thinking about storage capacity isn’t enough; selecting the proper size for your Azure VM and disk configuration to support your I/O needs is different and is typically where I find the root cause of performance issues for clients.
Azure VM Storage Considerations
Azure VMs have limits based on their size. This makes sense, considering you’re consuming a portion of a larger resource. The bigger the VM you provision, the more resources you’re allowed to use. This is true for ephemeral disk support and size, the number of disks the VM supports, I/O and throughput, network bandwidth, and other resources.
Azure VMs also support different storage types. You can pick from standard HDD, standard SSD, and premium SSD, and some VMs support ultra disk. Premium SSD should be the standard for any production SQL Server workload, in my opinion. The disk size will determine how many IOPS the disk supports and the available throughput. It’s possible to select a disk supporting more throughput and IOPS than the virtual machine supports.
The Azure VM size determines the various I/O caps, including cached and uncached disk throughput, and it’s crucial to understand these caps when you pick your VM. Otherwise, your workload can be seriously constrained—you can’t just pick a VM based on vCPUs and memory. Note these cap values are for the entire VM, regardless of the number of disks allocated to it. The image below shows how the DSv2 series has caps for temp storage, max data disks, max cached throughput, max uncached throughput, max NICs, and expected network bandwidth.
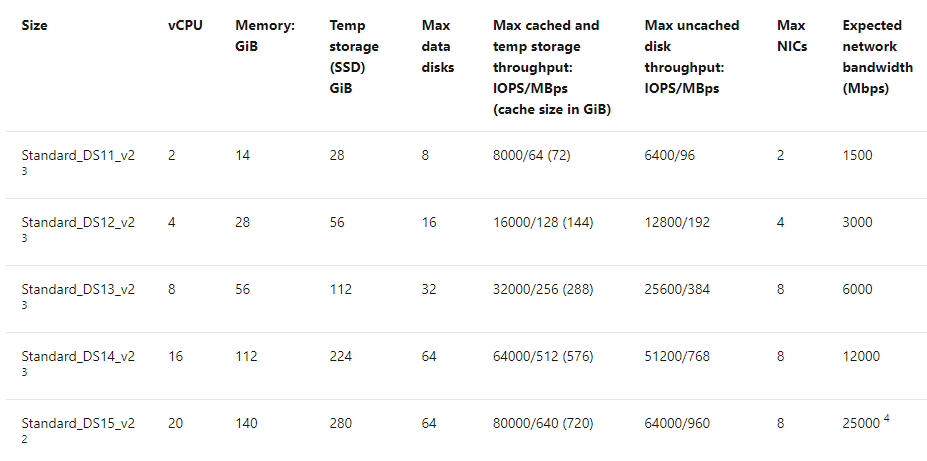
If you only need four vCPUs and 28GB of memory is enough but you need more than 192MBps of uncached disk throughput, then the DS12_v2 might not be the best choice. You’d have to increase up to the DS13_v2, which supports eight vCPUs, 56GB of memory, and up to 384MBps. Unfortunately, with this VM, you’d have to license those additional four vCPUs for SQL Server. A better choice would be a constrained-core VM with eight vCPUs. With constrained cores down to four, it would give you the same DS13v2 caps but remove the extra vCPUs. You end up paying for the compute as if all the vCPUs were present, but you don’t have to pay for an extra SQL license since you’d still only be using the four. I went into more detail on disk throughput and VM size choices in this SQLperformance.com post.
For disk type, consideration needs to be made based on storage capacity needs as well as throughput. You must balance how much storage capacity you need for data and log files, your overall throughput needs for data and logs, and what the VM supports.
Premium SSDs have caps based on the size of the disk and whether they support caching. A P30 disk is 1TB and supports 5,000 IOPS and 200MBps throughput per disk. A P40 is 2TB and supports 7,500 IOPS and 250MBps. Two P30 disks will provide more IOPS and throughput than one P40 disk. Depending on your overall storage capacity needs and how many disks the VM supports, multiple P30 disks could provide better performance results. If storage capacity is also an issue, then multiple P40 disks would be necessary.
Finally, I strongly recommend setting host caching to read-only for data file disks and none for log file disks.
How to Make SQL Server Faster on Azure VMs
What’s the secret to making SQL Server go faster on Azure VMs? In most cases I’ve seen, the answer is to fix the storage bottleneck—or better yet, avoid degrading performance by getting it right in the first place.
You need to capture your baseline before moving a workload to Azure or any new environment. Certain metrics like CPU utilization, page life expectancy (memory usage), and disk latency are easy, and tools like SolarWinds® SQL Sentry® capture them out of the box. Click here for a video and explanation of how you can use the tool to capture a performance baseline.
The important metric we need to pay attention to is the disk reads/writes per second. You can capture this using a third-party tool, Performance Monitor, or the sys.dm_io_virtual_file_stats DMV. If you’re using the DMV, you can use Paul Randal’s script to capture the data for a period of time (I use five minutes) and do the math to see the throughput broken down by database.
The key is to have the data to analyze, so you can know how much throughput you’re consuming and determine the following:
- The size of the VM to support the overall I/O need
- The disk configuration to support the capacity and I/O needs
- The actual storage capacity per disk
Why is doing this so important? On-premises organizations typically have large, super-fast SANs, and they’re not usually throttling their servers on throughput, especially for SQL Server instances. We size SQL Server instances on the number of vCPUs/CPUs needed, memory, and storage capacity. Things are different when working with Azure VMs. Size directly determines how much of the overall resources you’re allowed to use on the host. This is a good thing, as it prevents another guest VM from consuming your resources, but it changes how we’re used to provisioning servers for SQL Server or any high I/O server.
Conclusion
Running SQL Server workloads on Azure VMs isn’t much different than running them on-premises or in someone else’s data center. One key difference is how resources are capped based on VM size. Once you make sure your I/O workload fits within your VM size, optimizing the instance configuration is no different than it is on-premises—the same goes for tuning high-cost queries. Monitoring overall throughput to make sure you’re staying within the VM’s I/O availability and either tuning the workload or scaling up the VM will help maintain consistency in performance for your workload.