
If you work as an IT engineer or IT administrator and you are responsible for the network in your organization, it’s only a matter of time before a network problem comes up and everyone’s calling on you to solve it. The longer it takes to identify the issue, the more emails you’ll get from staff or clients, asking you why the problem isn’t solved yet.
I’ve written this guide on the most common network troubleshooting techniques and best practices to give you a starting point and structure for efficiently resolving issues as they arise. I’ll be using a bit of technical jargon here, so be ready to look a few things up if you’re not sure of the definitions. If you already know network troubleshooting methodology, but you are looking more for automated software read more about my favorite one SolarWinds Network Performance Monitor and read this article.
Network Troubleshooting Steps
- 1. Check the hardware.
- 2. Use ipconfig.
- 3. Use ping and tracert.
- 4. Perform a DNS check.
- 5. Contact the ISP.
- 6. Check on virus and malware protection.
- 7. Review database logs.
Network Troubleshooting Best Practices
- 1. Collect information.
- 2. Customize logs.
- 3. Check access and security.
- 4. Follow an escalation framework.
- 5. Use monitoring tools.
Troubleshooting Network Issues Conclusions
Network Troubleshooting Steps
Issues and problems can arise at numerous points along the network. Before you start trying to troubleshoot any issue, you want to have a clear understanding of what the problem is, how it has arisen, who it’s affecting, and how long it has been going on. By gathering the right information and clarifying the problem, you’ll have a much better chance of resolving the issue quickly, without wasting time trying unnecessary fixes. You can always start by working through these simple network troubleshooting steps to diagnose the issue.
1. Check the hardware.
When you’re beginning the troubleshooting process, check all your hardware to make sure it’s connected properly, turned on, and working. If a cord has come loose or somebody has switched off an important router, this could be the problem behind your networking issues. There’s no point in going through the process of troubleshooting network issues if all you need to do is plug a cord in. Make sure all switches are in the correct positions and haven’t been bumped accidentally.
Next, turn the hardware off and back on again. This is the mainstay of IT troubleshooting, and while it might sound simplistic, often it really does solve the problem. Power cycling your modem, router, and PC can solve simple issues—just be sure to leave each device off for at least 60 seconds before you turn it back on.
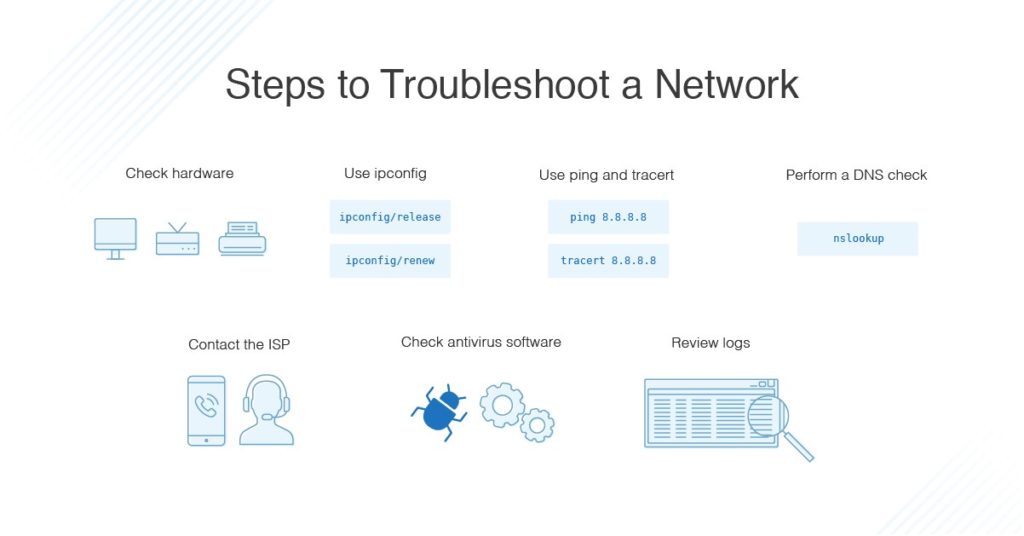
2. Use ipconfig.
Open the command prompt and type “ipconfig” (without the quotes) into the terminal. The Default Gateway (listed last) is your router’s IP. Your computer’s IP address is the number next to “IP Address.” If your computer’s IP address starts with 169, the computer is not receiving a valid IP address. If it starts with anything other than 169, your computer is being allocated a valid IP address from your router.
Try typing in “ipconfig /release” followed by “ipconfig /renew” to get rid of your current IP address and request a new one. This will in some cases solve the problem. If you still can’t get a valid IP from your router, try plugging your computer straight into the modem using an ethernet cable. If it works, the problem lies with the router.
3. Use ping and tracert.
If your router is working fine, and you have an IP address starting with something other than 169, the problem’s most likely located between your router and the internet. At this point, it’s time to use the ping tool. Try sending a ping to a well-known, large server, such as Google, to see if it can connect with your router. You can ping Google DNS servers by opening the command prompt and typing “ping 8.8.8.8”; you can also add “-t” to the end (ping 8.8.8.8 -t) to get it to keep pinging the servers while you troubleshoot. If the pings fail to send, the command prompt will return basic information about the issue.
You can use the tracert command to do the same thing, by typing “tracert 8.8.8.8”; this will show you each step, or “hop,” between your router and the Google DNS servers. You can see where along the pathway the error is arising. If the error comes up early along the pathway, the issue is more likely somewhere in your local network.
4. Perform a DNS check.
Use the command “nslookup” to determine whether there’s a problem with the server you’re trying to connect to. If you perform a DNS check on, for example, google.com and receive results such as “Timed Out,” “Server Failure,” “Refused,” “No Response from Server,” or “Network Is Unreachable,” it may indicate the problem originates in the DNS server for your destination. (You can also use nslookup to check your own DNS server.)
5. Contact the ISP.
If all of the above turn up no problems, try contacting your internet service provider to see if they’re having issues. You can also look up outage maps and related information on a smartphone to see if others in your area are having the same problem.
6. Check on virus and malware protection.
Next, make sure your virus and malware tools are running correctly, and they haven’t flagged anything that could be affecting part of your network and stopping it from functioning.
7. Review database logs.
Review all your database logs to make sure the databases are functioning as expected. If your network is working but your database is full or malfunctioning, it could be causing problems that flow on and affect your network performance.
Network Troubleshooting Best Practices
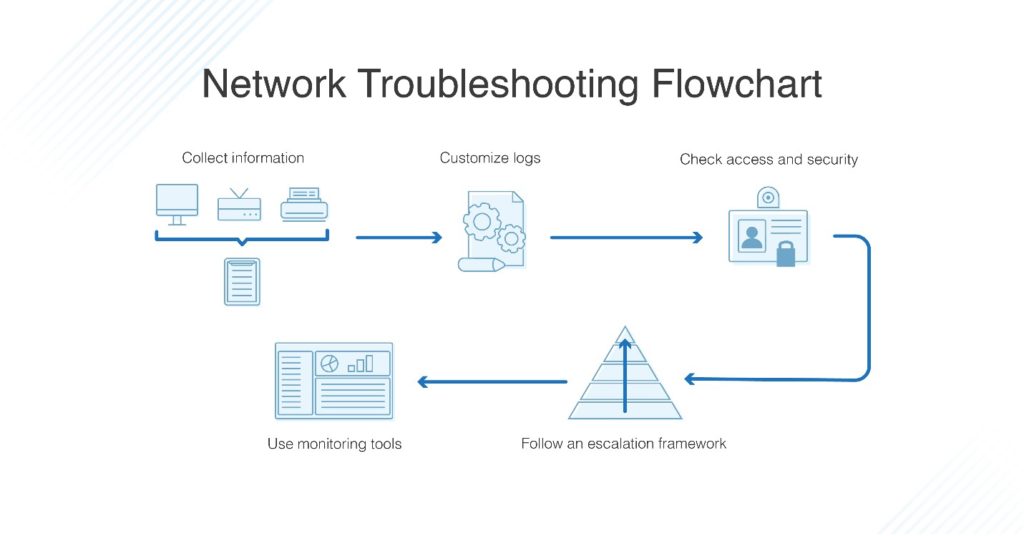
To make troubleshooting as efficient as possible, it’s very important to have best practices in place. As you work through the steps to try to solve network issues, following these network troubleshooting best practices can help streamline the process and avoid unnecessary or redundant efforts.
1. Collect information.
To best support your end users, you first need to make sure you’re clear on what the problem is. Collect enough information from both the people who are experiencing network issues and the network itself, so you can replicate or diagnose the problem. Take care not to mistake symptoms for the root cause, as what initially looks like the problem could be part of a larger issue.
2. Customize logs.
Make sure your event and security logs are customized to provide you with information to support your troubleshooting efforts. Each log should have a clear description of which items or events are being logged, the date and time, and information on the source of the log (MAC or IP address).
3. Check access and security.
Ensure no access or security issues have come up by checking all access permissions are as they should be, and nobody has accidentally altered a sensitive part of the network they weren’t supposed to be able to touch. Check all firewalls, antivirus software, and malware software to ensure they’re working correctly, and no security issues are affecting your users’ ability to work.
4. Follow an escalation framework.
There’s nothing worse than going to the IT help desk and being directed to another person, who then directs you to another person, who directs you to yet another. Have a clear escalation framework of who is responsible for which issues, including the final person in the chain who can be approached for resolution. All your end users should know who they can go to about a given issue, so time isn’t wasted talking to five different people who cannot fix the problem.
5. Use monitoring tools.
Troubleshooting can be done manually but can become time-consuming if you go through each step. When you have a bunch of people knocking on your office door or sending you frantic emails, it can be overwhelming to try to find the problem, let alone fix it. In business and enterprise situations, it’s best to use monitoring tools to make sure you’re getting all the relevant network information and aren’t missing anything vital, not to mention avoiding exposing the company to unnecessary risk.
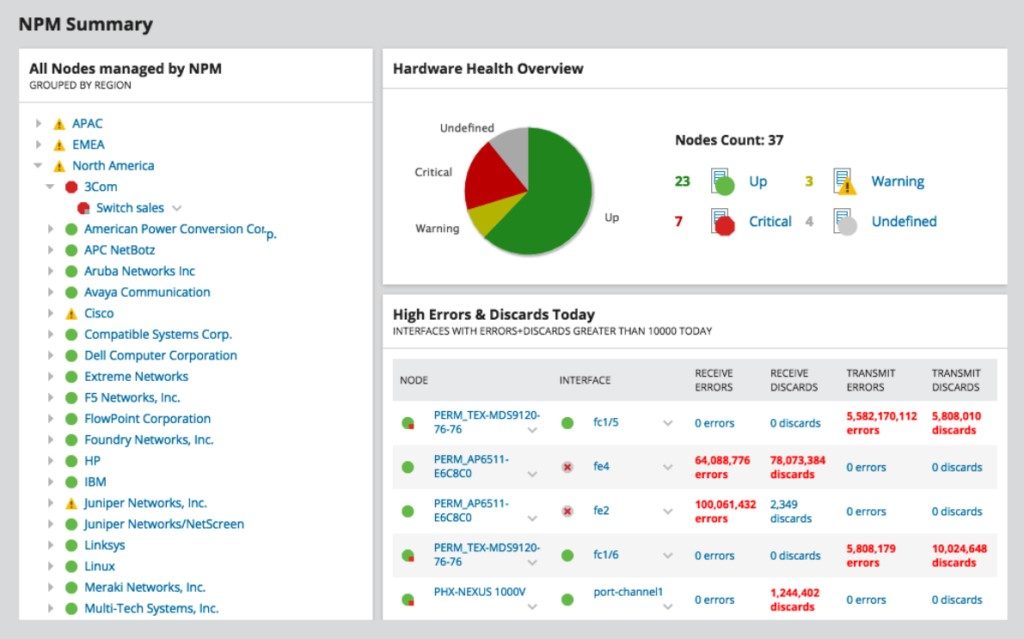
My preferred monitoring software is SolarWinds® Network Performance Monitor (NPM). It’s a well-designed tool with features to support network troubleshooting issues in an efficient and thorough way. It allows you to clearly baseline your network behavior, so you have good data on what your network should look like and how it usually performs, and it includes advanced alerting features so you don’t receive floods of alerts all the time. You can customize the software to alert you to major issues, choose the timing of alerts, and define the conditions under which alerts occur.
©2023 SolarWinds Worldwide, LLC. All rights reserved.
Other NPM features include NetPath™ network path analysis, which lets you see your network topology and performance pathways, and PerfStack™, which allows you to compare different performance metrics against each other, as well as historical data. With these tools, you can see which performance issues may be interlinked and troubleshoot the root cause faster. NPM also comes with tools like Wi-Fi sniffer, software for monitoring load balancers, switches, and firewalls, as well as wireless issues and coverage, all of which enables you to keep an eye on the overall health of your network and quickly pinpoint and fix issues as soon as they arise.
Troubleshooting Network Issues Conclusions
Network troubleshooting can be stressful at the best of times. Having clear steps to follow, an arsenal of best practices and a robust monitoring tool like Network Performance Monitor can help make the process as smooth as possible.