
Hyper-V is a virtualization software created by Microsoft. In this Hyper-V virtualization tutorial, we’ll look at some of the major Hyper-V virtualization concepts. In addition to covering the basics of Hyper-V virtualization and hardware virtualization technology, we’ll consider the benefits of virtualization, how virtual machines are managed, how to use Hyper-V virtualization technology, and Hyper-V considerations you should be aware of. This should provide you with a robust understanding of the nuances of Hyper-V virtualization technology.
I’ll also give my recommendation for the best Hyper-V virtualization software on the market: SolarWinds® Virtualization Manager (VMAN). This tool outshines competitors by combining an impressive range of advanced functionalities with optimal user-friendliness.
What Is Hyper-V and Hardware Virtualization Technology?
Virtualization Benefits
Virtualization Security
How to Use Hyper-V Virtualization Technology
Hyper-V Considerations
Managing Virtual Machines
Best Virtualization Software: SolarWinds Virtualization Manager
Getting Started With Hyper-V Virtualization Software
What Is Hyper-V and Hardware Virtualization Technology?
Hyper-V is a virtualization software initially released in 2016 by Microsoft. It’s built into Windows and is widely recognized as a major competitor to VMware Fusion and Oracle VM VirtualBox. Hyper-V can be used to virtualize hardware components and operating systems. Additionally, it’s not limited to the user’s device and can be used to facilitate server virtualization.
There are three versions of Hyper-V available:
- Hyper-V Server: a stand-alone product created for managing dedicated and virtual server instances
- Hyper-V for Windows 10: a product you can run on your laptop or desktop
- Hyper-V for Windows Server: an add-on for Windows Server
Hardware virtualization involves creating a virtual version of an operating system or computer as opposed to a physical version. Hardware virtualization technology was developed by AMD and Intel for their server platforms and was intended to improve processor performance. This technology was also designed to overcome basic virtualization challenges, like translating instructions and memory addresses.
Hardware virtualization is also referred to as hardware-assisted virtualization. It involves embedding virtual machine software into a server’s hardware component. This software goes by several names, but “virtual machine monitor” and “hypervisor” are the ones most commonly used.
Hardware virtualization technology is constantly evolving and continues to gain popularity in server platforms. The purpose of this technology is to consolidate numerous small, physical servers into one large physical server, thereby allowing the processor to be used more effectively. The physical server’s operating system gets converted into a distinct operating system running within the virtual machine.
The hypervisor exerts control over the memory, the processor, and several other components by permitting multiple operating systems to run on the same machine without requiring source code. The operating system being run on the machine will appear to have its own memory, processor, and other components.
Virtualization Benefits
There are numerous advantages associated with hardware virtualization technology, as managing and controlling virtual machines is easier than managing and controlling a physical server.
Virtualizing resources allows administrators to pool their physical resources. This means hardware can be fully commoditized. In other words, legacy infrastructure that supports critical applications but is costly to maintain can be virtualized to achieve optimal usage.
With virtualization technology, administrators don’t have to wait for every application to be certified on new hardware. They can simply set up the environment and migrate the virtual machine, and everything works exactly as before. When you conduct regression tests, you can create or copy a testbed, eliminating the need for redundant development servers or testing hardware.
One of the most notable benefits of virtualization is—with the right training—these environments can be continuously optimized to achieve greater density and more extensive capabilities.
Virtualization Security
If you’re new to the game, you may be wondering whether hardware virtualization technology is secure. It’s widely accepted that security should be integrated and continuous. Fortunately, virtualization provides a solution to many common security issues.
In environments where security policies require systems to be separated by a firewall, two systems can securely reside within a single physical box. In a development environment, every single developer can have their own sandbox, and these sandboxes are immune to other developers’ runaway or rogue code.
How to Use Hyper-V Virtualization Technology
This portion of the tutorial will use Hyper-V for Windows 10 as the primary example. There’s no need to download anything, as Hyper-V comes preinstalled on Windows 10. You will, however, still be required to activate Hyper-V before you can use it.
Here’s a step-by-step guide to activating and using Hyper-V virtualization technology.
Activating Hyper-V Virtualization
- Go to the control panel and select “uninstall a program.”
- Click on “turn Windows features on or off” in the sidebar on the left side of the screen.
- Locate “Hyper-V management tools” and “Hyper-V platform” under the subtitle “Hyper-V.” Activate these options by putting a tick in each box.
- You’ll be asked to restart your computer, so the appropriate changes can be made. Accept and allow your computer to restart.
Using Hyper-V Virtualization
- Launch the Hyper-V Manager.
- Click “connect to server” followed by “local computer” to connect to a default Hyper-V server. This is a requirement.
- You should see your PC name displayed as a local server on the left side of your screen. In the middle of your screen, you’ll see an overview of virtual machines currently in existence on the device. On the right side, you should see a list of commands under the subtitle “Actions.” To create a new virtual machine, select “quick create.”
- You’ll be given two installation options in a pop-up window. Choose whichever installation option you’d prefer.
- Choose the appropriate operating system and click “create virtual machine.” This will initiate the download process, which might take a while.
- To make other configuration changes, choose “new” in the main menu instead of “create virtual machine.”
To extend the capabilities of your Hyper-V hardware virtualization, you should use Hyper-V virtualization software. Effective software makes Hyper-V virtualization management significantly easier, more productive, and less error-prone.
Hyper-V Considerations
✔ Hosting
Hyper-V is a “native” or “type 1” hypervisor. This means it has direct access to the physical machine’s hardware. This isn’t the same as Virtual Server 2005, which is a “hosted” or “type 2” virtualization solution that doesn’t have direct access to the hardware and must be run on a host operating system (like Windows Server 2003).
The Hyper-V stand-alone version will run on bare metal. In other words, you don’t have to install it on an underlying host operating system. In this instance, you’ll lose the ability to run extra server roles on the physical machine, but it can be cost-effective. If you don’t use the Windows Server 2008 host, then you won’t have a graphical interface. The stand-alone Hyper-V Server must be administered via the command line.
Hyper-V Server 2008 is founded on the Windows Server 2008 Server Core. However, it doesn’t support additional roles—like file server, DHCP server, or DNS server—supported by Server Core. Because they share the same kernel components, special drivers aren’t required to run Hyper-V.
✔ Licensing
Windows Server 2008 Standard Edition lets you install one instance of the operating system and one virtual machine. The Enterprise Edition lets you run up to four virtual machines. The Datacenter Edition allows you to run an unlimited number of virtual machines. However, the stand-alone Hyper-V edition doesn’t include any licenses for operating systems.
Although an underlying host operating system isn’t required, it’s still necessary to purchase licenses for any Windows instances installed in the virtual machines. Both the stand-alone and Windows 2008 Hyper-V versions support the following Windows guest operating systems:
- Windows Server 2008 x86 and x64
- Windows Server 2003 x86 and x64 (with Service Pack 2)
- Windows 2000 Server (with Service Pack 4)
- Vista x86 and x64 (Business, Enterprise, and Ultimate editions with Service Pack 1)
- XP Pro x86 and x64 (with Service Pack 2 or higher)
Hyper-V also supports the installation of Linux virtual machines for SUSE Linux Enterprise Server 10. However, other Linux distributions have been reported to run on Hyper-V. Linux virtual machines are set up to use only one virtual processor, as are XP Service Pack 2 and Windows 2000 virtual machines.
✔ Compatibility
With Hyper-V, every virtual machine is saved to a VHD file. This is the same file format used by Virtual PC 2003 and 2007 as well as Microsoft Virtual Server 2005. The VHD files created by Virtual PC and Virtual Server can be used with Hyper-V, but it’s worth noting there are some virtual hardware differences. This means the virtual machine operating systems might need to have their drivers updated.
If you choose to move a virtual machine from Virtual Server to Hyper-V, you’ll need to uninstall the Virtual Machine Additions from the virtual machine while Virtual Server is running. The next step is to shut down the virtual machine in Virtual Server. Don’t save it—saved states are incompatible between Hyper-V and Virtual Server.
VMware utilizes the VMDK format, but you should be able to convert VMDK images into VHD files via the System Center Virtual Machine Manager. Alternatively, you can do this by using the Vmdk2Vhd tool.
✔ Hyper-V Management
The Vista Hyper-V management tool lets you remotely manage Hyper-V from your Vista desktop. You should have Service Pack 1 installed before installing and using the management tool.
You can also use Microsoft System Center Virtual Machine Manager 2008 to manage Hyper-V virtual machines as well as virtual machines running on VMware ESX v3 and Microsoft Virtual Server. If you integrate with Microsoft SCCM, you get access to reporting, templates, and other functionalities designed to make creating and managing virtual machines much easier.
✔ Virtual Networks
You can choose between the following three virtual networks for use on a Hyper-V server:
- Internal network: This allows for communication between the physical machine the Hyper-V is installed on and the virtual machines.
- Private network: This allows for communication between virtual machines only.
- External network: This allows for the virtual machines to interact with other physical machines through the Hyper-V server physical network adapter.
✔ Emulated and Synthetic Devices
Although users won’t see this terminology used in the interface, it’s important for you to understand the difference between emulated and synthetic devices so you can get the best performance out of your Hyper-V machines.
“Device emulation” refers to the way virtualization software handles hardware devices in Virtual PC and Virtual Server. The emulation program runs in the parent partition, which is the partition capable of requesting new partitions from the hypervisor. Most operating systems already have device drivers for these devices. They can boot with them, but they’re generally slower than synthetic devices.
The synthetic device is a relatively new Hyper-V concept. These devices were developed to work with virtualization and have been optimized to function in this environment. This means performance is usually better with synthetic devices than emulated devices. When you’re choosing between the Legacy Network Adapter and the Network Adapter, it’s helpful to note the former is an emulated device and the latter is a synthetic device.
Bear in mind, certain devices—like video card and pointing devices—can be booted in emulated mode before being switched to synthetic mode once the drivers are loaded. This can increase performance. To optimize performance, you should choose synthetic devices over emulated devices.
✔ Integration Components
Once you’ve successfully installed an operating system on your Hyper-V virtual machine, you’ll need to install the integration components. This refers to a group of services and drivers allowing guest operating systems to use synthetic devices. They can be installed on Windows Server 2008 by going to the “Action” menu in the Hyper-V console and selecting “Insert Integration Services Setup Disk.” With certain operating systems, you’ll have to navigate to the CD drive to install components manually.
Managing Virtual Machines
Virtualization management software was created to simplify the virtualization process. You can manually allocate resources to virtual machines, test them, create space for them on servers, and install patches when necessary, but dividing single systems into hundreds is time-consuming and resource-intensive because you’re responsible for running those systems, keeping them up-to-date, and safeguarding them.
When virtual machines are paired with a provisioning, monitoring, or management solution, you can automatically migrate systems to more appropriate hardware. This is extremely useful during maintenance or peak use periods. With effective virtual machine management tools, you can retask a bulk number of servers in a matter of seconds, depending on the time of day and workload. When a guest instance starts consuming more resources, the virtual machine monitoring system can move this guest to an alternate server with less demand or allocate extra resources from the central pool.
In short, virtual machine management is much more effective when dependable monitoring and management tools are implemented.
Best Virtualization Software: SolarWinds Virtualization Manager
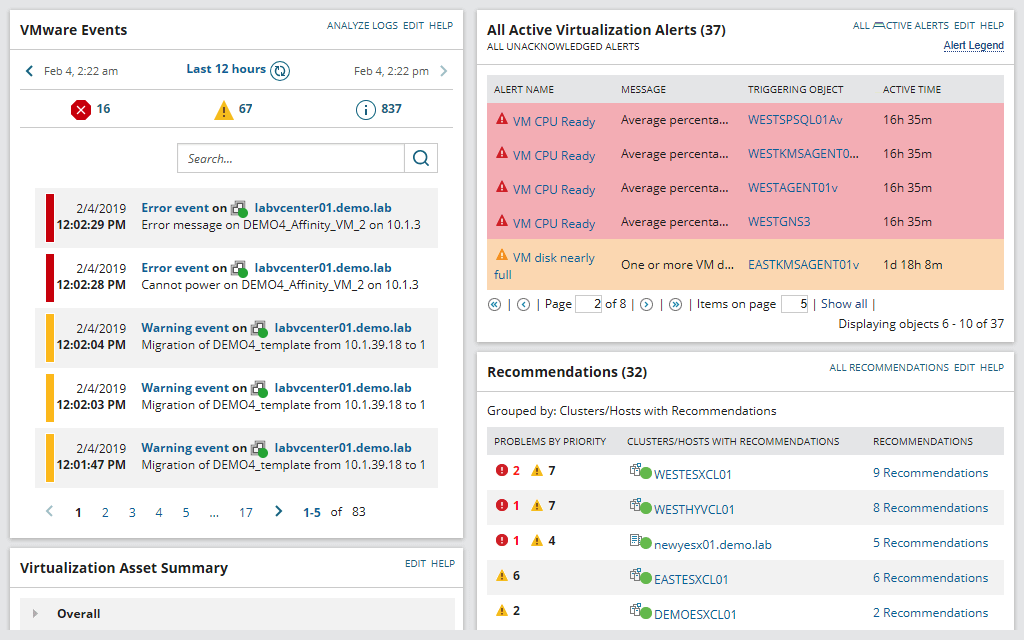
SolarWinds Virtualization Manager is a virtual machine monitoring solution designed to boost performance by rapidly rectifying any problems it encounters. This tool is a highly feature-rich Hyper-V virtualization solution with a dynamic interface. Data is represented graphically wherever appropriate in the forms of graphs and charts, making interpretation fast, easy, and accurate. The layout is widget-based, giving all key information a space of its own and preventing the dashboard from becoming cluttered.
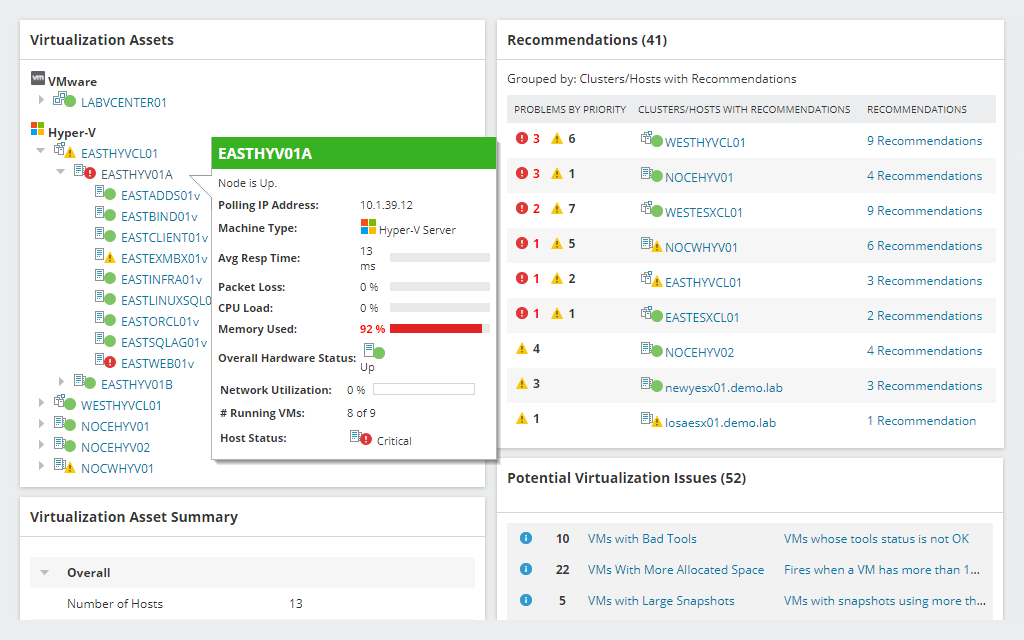
With VMAN, you can solve issues rapidly (sometimes with no more than a single click) because remediation actions are built in. This means you can address problems without needing to log in to a hypervisor. Performance insights support problem-solving, giving you visibility into capacity and usage of virtualized infrastructure, including virtual machines, clusters, containers, and alternative datastores.
VMAN also offers virtual machine recommendations. It uses actionable intelligence to facilitate single-click remediation of current and predicted recommendations. This feature optimizes resource allocation and virtual machine performance. Recommendations can be run individually, or you can multi-select them to run them simultaneously. You can even schedule them to be run at a later time or date.
One of the best VMAN features is the ability to reclaim resources back into the virtual pool. With VMAN, you can power down idle virtual machines and powered-off remote virtual machines. You can also do this for orphaned VMDK files. VMAN lets you delete snapshots (so resources can be reclaimed) as part of its VM sprawl control management functionalities.
This versatile tool can be managed across on-premises, cloud, and hybrid environments. It uses a robust alert system to keep you notified of any problems, with alert categories ranging from “critical” to “informational.” VMAN provides a powerful capacity planning solution, allowing you to predict network, CPU, memory, and storage requirements for both VMware vSphere and Hyper-V.
VMAN boasts many advanced functionalities beyond those mentioned, and these functionalities cover a range of Hyper-V virtualization concepts and operations. It combines sophisticated functionalities with user-friendliness, delivering a simple but effective solution. Click here for a 30-day free trial.
Getting Started With Hyper-V Virtualization Software
This Hyper-V virtualization tutorial has provided a definition of Hyper-V software and hardware virtualization technology, outlined key Hyper-V considerations and concepts, and given you insight into how to use and make the most of this technology. Hyper-V virtualization technology can be complicated and difficult to manage, but the right software can simplify and optimize the management experience. In my opinion, the best Hyper-V software on the market today is SolarWinds VMAN. VMAN is a user-friendly tool offering various features, many of which are ahead of the market curve. With VMAN, you’ll gain access to nuanced insights and enhanced resource planning capabilities.