
Microsoft Hyper-V is a powerful virtualization solution used by many enterprise data centers across the world. Although it’s a robust and high-performing tool, you can implement some best practices and tips to optimize your Hyper-V performance. Following these tips can help reduce Hyper-V performance issues and enhance the virtual machine (VM) workloads running in your environment.
To increase Hyper-V performance, you’ll need to consider CPU, memory, storage, the hypervisor host, and networking. Each of these components is crucial to ensuring production workloads are fully optimized, as poor Hyper-V performance tuning in these areas can result in bottlenecks with a negative impact on production performance.
This guide will outline key adjustments you can make to your system, thereby significantly improving Hyper-V performance. It will also review SolarWinds® Virtualization Manager (VMAN), a top Hyper-V performance monitoring solution.
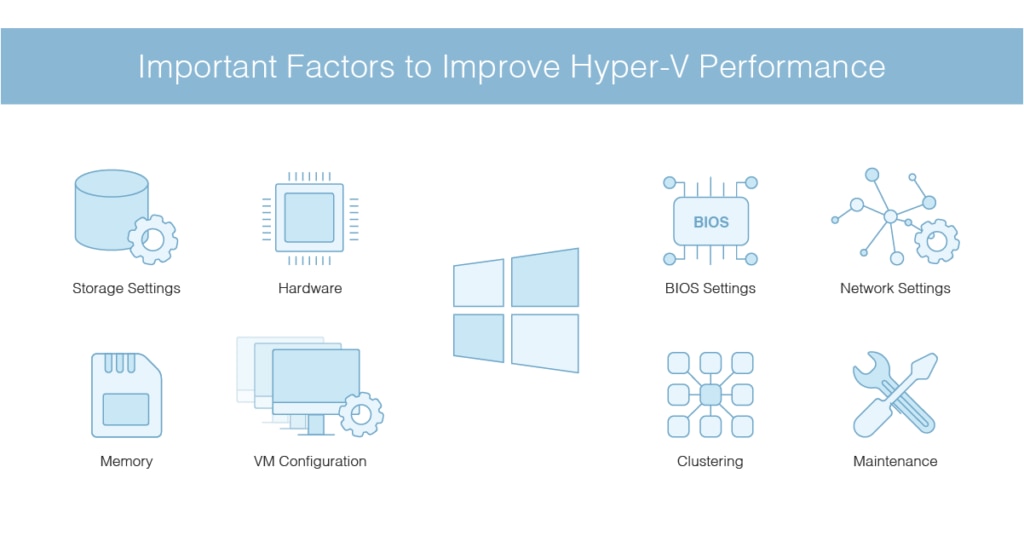
- Storage Settings Tips
- Hardware Tips
- Memory Tips
- Virtual Machine Configuration Tips
- BIOS Settings Tips
- Network Settings Tips
- Clustering Tips
- Maintenance Tips
- Choosing the Right Hyper-V Performance Tool
- How to Improve Hyper-V Performance
1. Storage Settings Tips
Storage is one of the most important areas to fine-tune. Knowing what your storage solution can and can’t do is a key step in adjusting your storage settings to improve Hyper-V performance. Therefore, many of these tips are designed to change how you approach storage, encouraging you to understand the limitations of storage and storage technology. For example, rotating hard disks are unlikely to transmit data quickly. You could purchase lots of them and create big RAID 10 arrays or get a stack of solid-state drives (SSDs) as an alternative.
The following tips will address misconceptions and provide ways to refine your approach to storage settings and Hyper-V performance.
- Remember speed tests do not accurately reflect real-world load.
- File copy tests permissions, but nothing else.
- Don’t expect 100% access to storage bandwidth. If a file copy is slower than you anticipated, this doesn’t mean your system won’t adequately perform its production role.
- If you feel sure your system needs complete and total storage speed, then you shouldn’t virtualize it. A virtual machine cannot achieve that speed without taking I/O from other guests.
- Ensure your processes have a healthy cache configuration by enabling read caches. This benefits workloads with a large working set in memory and production workloads with many virtual processes. Here are three system elements likely to have a read cache:
- Internal storage
- Cluster shared volumes
- SAN/NAS (storage area network/network-attached storage)
- Don’t overlook the risks of write caching. If you want to enable write caches, take measures to ensure this won’t negatively impact your system. Write caching is generally acceptable when your internal disks, SAN, NAS, or DAS (device-attached storage) has a battery backup system that can undertake power outage cache flushes. Ideally, your system will feature internal batteries that report on their status or can automatically disable caching. While UPS-backed systems are sometimes acceptable for write caching, they aren’t ideal and can pose risks.
- Given the option between few arrays with numerous disks, and numerous arrays with few disks, choose the former.
- Don’t create a Hyper-V array unless you intend on storing your virtual machines on a remote system. If you have six internal bays, for example, don’t create a RAID 10 for virtual machines and a RAID 1 for Hyper-V. This arrangement is a Microsoft SQL Server 2000 design and isn’t appropriate for 2019 Hyper-V server building. Instead, use all the bays in a single array.
- Set up your fiber channel SANs to use tight WWN masks because live migration requires the ability to execute a handoff from one system to another. The tighter the mask, the less time this takes.
- When using gigabit, endeavor to separate iSCSI/SMB from your virtual switch, at the physical level. This will mean traffic doesn’t have to endure the overhead associated with virtual switch processing.
- Try to keep iSCSI/SMB networks clear of unnecessary traffic. In clustered systems, multichannel SMB requires every adapter to exist on a unique layer 3 network.
- MPIO and SMB multi-channels are quicker than even the best teaming.
- If you decide to run MPIO or SMB traffic across a team, be sure to create numerous logical or virtual NICs (network interface controllers). This will create more opportunities for the teaming implementation to generate balanced streams.
- If supported by switches, host adapters, and back-end storage, use jumbo frames for iSCSI/SMB connections.
- Enable RDMA-capable adapters, if you have them, and RSS on SMB-carrying adapters.
2. Hardware Tips
This is a crucial point, and it applies to more than Hyper-V performance tuning. Remember, hardware can’t to exceed its capabilities, and every piece of hardware will have an upper limit on the speed it can achieve. Put simply, if your hardware is slow, your Hyper-V environment is likely to be slow.
This doesn’t necessarily mean you have to empty your pockets on new, expensive hardware. Production systems—particularly server-class systems—rarely experience demand levels close to the demand placed on new equipment by stress-testing processes. Better utilization of under-loaded server equipment, with the aim of facilitating cost savings, was one of the major reasons for early virtualization adoption.
3. Memory Tips
Modern memory is very fast, and operating systems are highly advanced. There are, however, some memory best practices you can implement to increase Hyper-V performance.
- If you have multiple CPUs, install your memory so it uses multichannel. This setup supplies an even amount of memory to each individual non-uniform memory access (NUMA) node.
- Keep an eye on the quality of your operating system’s driver. Windows drivers aren’t like applications, because they can remove memory from the available pool permanently. If memory is improperly managed, you could encounter some serious Hyper-V performance issues.
- Avoid making your CSV cache too big.
- Limit the amount of memory you use for a virtual machine to an amount you can prove is necessary. Avoid using more memory than can fit in one NUMA node.
- If your virtual machines are performing a high number of memory operations, avoid using dynamic memory, which disables NUMA. Hyper-V performance monitoring can assist you in determining what constitutes a high number of memory operations.
- Dynamic memory can be used for virtual machines that don’t require the fastest memory performance.
- Set the fixed memory for your virtual machines to a shorter startup delay and a higher priority than your dynamic memory. These settings will ensure virtual machine fixed memory is prioritized, which will let your Hyper-V plot a suitable NUMA layout and minimize instances of memory fragmentation.
- The minimum dynamic memory for virtual machines should be set to the operating system’s official minimum, which is 512 MB for Windows Server. If a critical application is being hosted by the VM, increase the minimum to protect this application’s operations.
- Set the maximum dynamic memory for virtual machines to an appropriate amount. You’ll discover this ideal amount through performance monitoring and trial and error.
4. Virtual Machine Configuration Tips
The following tips pertain to how you can tweak virtual machine configurations to improve Hyper-V performance.
- Avoid using the legacy network adapter in generation 1 virtual machines unless completely necessary.
- Use checkpoints as rarely and briefly as possible.
- Don’t use BitLocker or shielded VMs. The hardening and encryption VM worker processes incur significant overhead, which can cause Hyper-V performance issues.
- Use time synchronization appropriately. This means virtual domain controllers shouldn’t enable the Hyper-V time synchronization service. However, generally, all other virtual machines should have Hyper-V time synchronization enabled. Hosts should pull their time from the domain hierarchy, and if possible, the primary domain controller should pull from a secured time source.
- Hyper-V guest services should be properly maintained and kept up-to-date. Certain systems, like supported Linux systems, can be updated from their distribution repositories via kernel updates. Windows Server 2012 R2+ and Windows 8.1+ will update from Windows Update.
- Avoid conducting full defragmentation in guests.
- If the primary purpose of the virtual machine is to run an application with its own replication technology, don’t use Hyper-V Replica. Applications including Microsoft SQL Server and Active Directory can replicate themselves more effectively than through Hyper-V Replica.
- If you are using Hyper-V Replica, consider transferring the page files of your virtual machines to a virtual disk, and excluding the disk from the replication process.
- For those using Hyper-V Replica, enable compression if you have access to spare CPU. If you have spare network capacity, however, leave compression disabled.
5. BIOS Settings Tips
Your BIOS contains some of the most important settings for Hyper-V performance, so giving it proper attention and consideration is crucial.
- Disabling C states is one of the best ways to improve Hyper-V performance. The names and destinations of C states will differ, but they can often be found in areas relating to performance, power management, and processor/CPU. If you struggle to find C states, disable or minimize power management settings instead. Live migration issues are often caused by C1E, although other modes can create problems too.
- The Data Execution Prevention, or DEP, feature does more for security than for performance. DEP should be enabled. If you can’t find it under the name “DEP,” try looking for the following:
- Execute Disable (XD) — used in Intel CPUs/mainboards
- No Execute (NX) — used in AMD CPUs/mainboards
- Use hyperthreading. Although there’s some contention around whether hyperthreading is useful for improving Hyper-V performance, it’s generally considered to be highly effective. If you’ve encountered issues with hyperthreading, there may have been a problem with your CPU.
- If you’re not planning on booting your host from a storage area network, you should kill the BIOSs existing on your SCSI adapters advisable because an SCSI card’s BIOS can slow down physical boot times.
- Disable BIOS-set VLAN IDs on physical NICs. Some network adapters use boot-up interfaces to support VLAN tagging. When a Hyper-V virtual switch is bound to this kind of adapter, you’re likely to encounter network issues.
6. Network Settings Tips
Appropriate network configurations can significantly improve Hyper-V performance. Apply the following tips for the best outcomes.
- Disable VMQ on your gigabit adapters.
- If you use a Hyper-V virtual switch, and you have VMQ disabled on physical NICs, make sure you also disable it on the team adapter.
- Your Hyper-V may not be the source of networking issues. Understanding that your networking problems could be caused by something else can save you significant time, which could be more usefully spent on realistic Hyper-V performance tuning efforts.
- Use one virtual switch, instead of multiple. When you use numerous virtual switches, this can cause unnecessary processing overhead without providing returns. While this is certainly not a rule, you should avoid multiple virtual switches unless necessary.
7. Clustering Tips
If you want to ensure optimal performance for your virtual machines, don’t cluster them. Instead, use direct-attached or rapid internal SSDs. Clustering should be implemented for the sake of redundancy, not performance. Rather than rely on Hyper-V clustering, use application-level redundancy techniques.
Unfortunately, in the era of the cloud, most software doesn’t have its own redundancy, which makes host clustering a requirement. The following best practices apply to clustering and can help you improve Hyper-V performance.
- Validate your cluster and make yourself aware of warnings, even if you don’t address them.
- Keep your sights set on your initial density target and add the necessary nodes to maintain it. Be sure to have enough surplus of nodes to protect your system from failure.
- Ensure you’re using the same hardware for each of your nodes. Although you can mix hardware, CPU compatibility mode and any mismatched NUMA nodes can have an impact on performance.
- If you are using Hyper-V, every cluster node should have a minimum of two distinct IP endpoints, and each IP must exist in a distinct subnet. This lets the cluster establish simultaneous network streams to accommodate inter-node traffic. To implement this recommendation effectively, take the following into consideration:
- One of the IP addresses must be designated as “management.” This means it has a valid default gateway and register in DNS. This IP will be used by any inbound connections, like PowerShell Remoting.
- The non-management IP addresses shouldn’t have a default gateway or register in DNS.
- For live migration, give one alternative IP endpoint preference and prioritization. Cascade live migration preference order through the other IPs, concluding with the management IP. These settings can be configured via the Failover Cluster Manager. Just right-click on the “Networks” node to get started.
- Use additional IP endpoints to create extra cluster communication pathways. A cluster communication could be an update message, a cluster status, a heartbeat, or Cluster Shared Volume data.
- You can exclude adapters from cluster communications, but still include them in live migration, thereby facilitating segregation. While this may not necessarily improve performance, it’s appropriate under certain circumstances.
- The IP for every cluster adapter must exist in a unique host subnet.
- Virtual or physical network adapters can be used to host cluster IPs.
- Every cluster node needs to contain an IP address in the same subnet as the IPs contained in other nodes. If this isn’t implemented correctly, it could result in the network being partitioned and the nodes without member IPs being excluded.
- If RDMA-capable physical adapters are being used, you can optimize live migration performance with compression.
- If your adapters aren’t RDMA capable, use SMB as an alternative to compression.
8. Maintenance Tips
Once you’ve deployed your Hyper-V environment and tweaked the settings, you’ll need to consider how you’ll conduct ongoing maintenance. The following tips will help you keep your Hyper-V performance optimized long after your system has been deployed.
- Take a performance baseline when your system is first deployed. You can refer to this in the future to see if performance has been impacted over time.
- Take a second performance baseline when the system establishes a normative load level—in other words, when you’ve reached your expected number of virtual machines.
- Stay up to date. This is simple but crucial advice. Your drivers must be kept up to date, and settings should be verified regularly, especially after an update, to ensure they aren’t lost in the process.
- Monitor the health of your hardware frequently. You can do this by monitoring the Windows Event Log, which can provide early warnings.
- One of the most effective ways of maintaining your system and monitoring Hyper-V performance is through a Hyper-V performance monitoring tool.
Choosing the Right Hyper-V Performance Tool
The increasing number of IT software tools on the market makes choosing the right Hyper-V performance monitoring program difficult. There are several factors to consider, including range and sophistication of functionality, the dependability of the developer, cost-effectiveness, suitability for business use, and scalability.
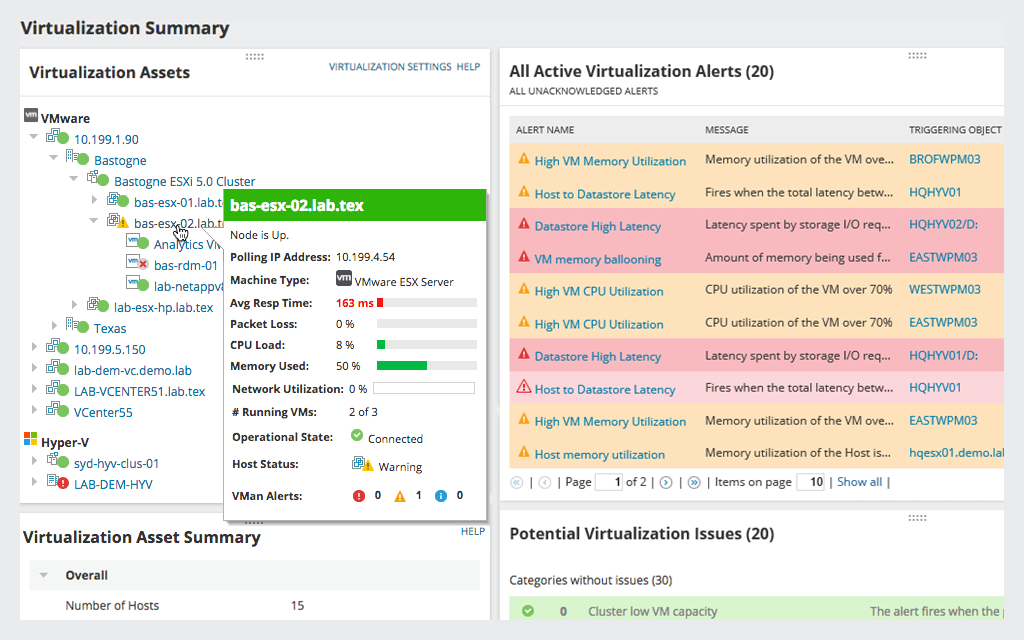
I recommend SolarWinds Virtualization Manager (VMAN) as the best Hyper-V performance monitoring tool. This software is versatile, advanced, and user-friendly. The vendor has been producing IT monitoring and management tools for decades; one of its most popular software, SolarWinds Network Performance Monitor, is well known among IT administrators. SolarWinds is a dependable developer that provides ample support to its users, with a thriving community of fans accessible via the SolarWinds THWACK® community, in addition to 24/7 support technician availability.
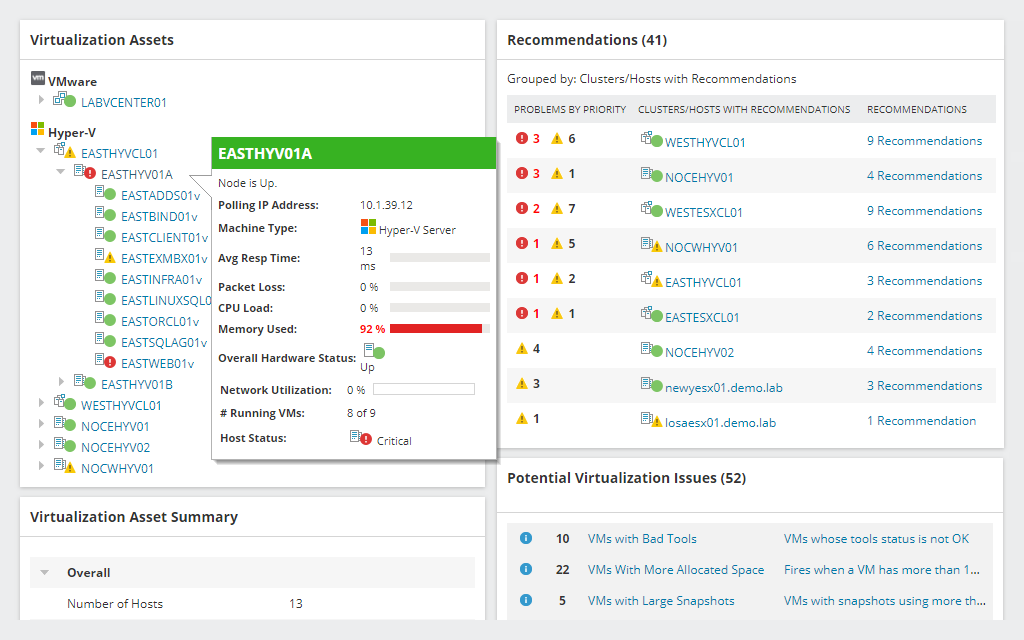
Fortunately, SolarWinds users rarely need to depend on these support initiatives, because the SolarWinds product line is user-friendly. Virtualization Manager facilitates virtual machine monitoring and management and features a dynamic dashboard. Data is represented as graphics where possible, in the form of charts and dials, making it easy to read and accessible. The dashboard is uncluttered, and key metrics are displayed as widgets you can adjust and reorganize to suit your preferences.
VMAN is especially effective at increasing and maintaining Hyper-V performance. The customized dashboard is equipped with alerts to notify you of critical VM performance problems, like datastore latency, phantom snapshot files, high CPU utilization, and memory ballooning. The alerts can be customized at different layers of your Hyper-V environment, including VM, host, and cluster.
The preconfigured alerts mean you can get started as soon as the tool has been launched, delivering critical warning messages and recommendations for managing Hyper-V performance. In addition to measuring critical storage metrics, like IOPs, throughput, and read/write, you can thoroughly interrogate and analyze storage I/O performance.
VMAN doesn’t just provide virtualization performance management capabilities. It also supports sprawl management, capacity planning, application stack management, and much more.
One of my favorite features is dependency mapping, which lets you place objects in conversation with each other and view related objects instantly. The “time travel” functionality is especially unique, giving you a complete historical account of VM configuration data and infrastructure relationships. This allows you to identify historical dependencies within a specific time frame.
Virtualization Manager’s VM capacity planning tool is another welcome feature, helping you predict memory, network, CPU, and storage needs for your VMware vSphere and Microsoft Hyper-V environments. The VM capacity planner enables you to make informed hardware purchase decisions by compiling data on VM growth and resource constraint statistics. With VMAN, viewing consumption trends to identify outage dates and resource warnings is easy. You can customize the sample time frame, allowing you to create capacity plans for non-peak and peak usage.
How to Improve Hyper-V Performance
Hyper-V is a widely used virtualization platform, enabling SysAdmins to extend the value and capabilities of their resources. By making the right tweaks to your system and undertaking monitoring and management processes, you’ll find you can significantly boost your Hyper-V performance—and the performance of your system.
The tips in this guide cover eight fundamental areas: storage, hardware, memory, VM configuration, BIOS, network, clustering, and maintenance. When it comes to maintenance, I recommend implementing SolarWinds Virtualization Manager. The software is highly scalable and cost-effective, making it suitable for small and large businesses alike, and requires little to no experience to get started. A 30-day free trial is available for download.